Voice 819.647.5092 Fax
819.647.6082 mheat@mha-net.org www.heatkit.com RR 5
Shawville Québec J0X 2Y0
![]()

Revised August 4, 2003
Instructions For Finishing Heater
Table of Contents
General........................................................................................................................................................................................... 1
Installing the Sliding Chimney
Damper..................................................................................................................................... 5
Installing the Doors..................................................................................................................................................................... 5
Installing Doors in a Stone
Facing............................................................................................................................................ 7
Installing Bakeoven Door........................................................................................................................................................... 7
Installing Firebox Air and
Outside Air...................................................................................................................................... 8
Template for Oven Arch in
Facing............................................................................................................................................ 9
General
Heater is faced with approximately 5” of masonry.
Typically this is 4” of brick and a 1” mortar slush between the facing and the
core to provide a seal. Bricks are normally laid out to the nearst half brick,
so this gap will vary.
Mortar for facing: Mortar should
be fairly "soft" - masonry cement is O.K. Portland cement/lime mortar
should only be used with a high lime ratio - 1:1:6 portland/lime/sand.
Cavity between back of facing and heater core should
be slushed solid with mortar for
good heat transfer. IMPORTANT:
Do not to puncture the glass mat expansion joint material. Direct contact
between the facing and the core in these areas can result in a cracked facing.
Cleanout doors can simply be mortared in
place. Use the steel bars provided to span openings. They can also be installed
later with silicone.
Chimney
Connection
- Use flue liner; simply make a solid connection between facing and chimney.
Leave expansion joint above liner by laying in a fiberglass cutoffs from heater
wrap, or a piece of cardboard. Liner should have about 8" of solid masonry
above it.
Door Opening: Start door opening 1 - 1.5
courses above firebox floor. If facebricks are cored, fill cores solid around
area of door opening. Steel lintel for facebrick must be set at same height or
slightly higher than firebox lintel to allow firebrick heat shields to slide
underneath.
Rough opening for doors is 18" wide x 20 - 21
½" high. However, the actual opening width in face brickwork is 20
¾". This allows for a 1 ¼" firebrick lining on the door jambs (This
is to keep the facebrick from being exposed in the firebox). See photos on page
4 for lining doorjamb with splits. The 20 ¾" opening usually doesn't work
out too well to the brick bond, so you have to do it carefully.
Angle iron
lintel
above door opening: be sure to provide room at the ends for expansion,
otherwise the facing will crack. Best way is to put a bit of mineral wool or
fiberglass insulation around the ends.
Sliding
Shut-off Damper: Install in chimney high enough
so kids can't reach and you don't hit your head on the handle (6 to 7 ft.). It
should tilt slightly inwards (1/16”) so that any rainwater getting down the
chimney and reaching the damper plate
doesn't run into the room and stain the chimney.
Don't set flue liners directly on damper frame, or
damper will eventually bind. Instead, corbel bricks above damper to make a
ledge for the rest of the liners to sit on. It also helps to mortar in solid
the first 6" of flue liner above damper, so that it can't slip down.
Alternatively, run steel bars above damper for flue
liners to sit on, and then mortar solid
the first 8" of liner above the damper.
Figure 1 - Section through generic heater (no
oven).
Heater Top: (See Figure
1) Run facing past top of core a minimum of 4".
The core will lift up inside the facing when heated,
so it is necessary to install a "crushing
zone" above the core. This is simply 2" of soft vermiculite mix -
6 parts vermiculite to 1 part portand cement. Finish with a 4:1 vemiculite mix, within 1/2" of
top. Finish off with a piece of expanded metal lath (provided) and a 1/2 inch
mortar topping. If heater top shows and needs to be finished in brick, etc.,
raise height of facing accordingly.
Now
is a good time to install the firebrick
splits that face the sides of your
rough door opening. Refer to separate “Door Installation Instructions”,
below. The silicone used needs a day to set before doors are actually installed.
Note expansion
joint at top joint with steel lintel. Gap is stuffed with white ceramic fiber.
Install Ash
Dump: set
it in firebox floor opening.
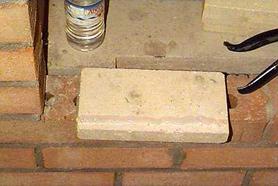
Install
Firebox Floor Slopes: These are two triangular pieces about 16” long. Set them in
refractory mortar. The space between the front of the floor slopes and the
facing is used to hold the 3” steel bar for the combustion air slot in place,
see next item.
Combustion Air
Slot: Refer
to Figure
7, below. At the front of the firebox floor, you will
see an air slot. Once the facing is on, take the 3” steel bar provided and use
it to form the 1” x 14” combustion air
supply. Air should exit the slot
horizontally, aimed at the back of the firebox. Set the ends of the bar in
place with castable refractory or regular mortar.
Install doors according to separate
instructions provided below.
Chimney: Install a rain cap. Remove
damper sliding plate while building
chimney to avoid mortar droppings forming a mortar bridge at the damper. Be
sure to clean dropped mortar from chimney cleanout before it hardens. Also
check heater cleanouts for mortar droppings from core construction.
Installing the Sliding Chimney Damper

Figure 2
Installing the Doors
These doors are designed for use in contraflow
heaters using the Heat-Kit firebox design.
Rough masonry opening: 20 ¾" wide, 20 - 21 ½
" high. This leaves a 1/4" expansion joint on the sides, once the
door jambs are lined with firebrick splits
Setting
Splits in Door Jambs:
|
Figure 3 |
Install
a day ahead of doors to allow silicone to set.
Splits
come to 1/4” below steel lintel, 2 full plus a small piece.
Set splits as shown, with a solid bead of silicone
along the front edge and dabs of silicone along the back. The gap shown is
exaggerated - press splits against face bricks. Use a thin bead of silicone for
the head joints between the splits, including the bottom joint with the
facebrick. Set the small topmost piece, and stuff topmost joint (at steel
lintel) with ceramic fiber once silicone has set.
Installing
Door
Lay a 2 inch wide by 1/4" thick strip of
mineral wool or ceramic fiber across the bottom of the door opening.
Have a helper hold the doors in place
Note that there are twice as many pre-drilled holes
in the door frame as you need, so that you can pick the best spots to drill
into the face.
Hammer drill 3/16” holes through the splits and into
the facebricks to the depth of the Tapcons. Drill the holes slightly inwards,
to avoid coming too close to the outside face. This also helps to draw the
doors tight to the face.
Switch to a ¼ ” bit and ream out holes in splits.
Using a 5/16" socket and ratchet, screw in the
Tapcons provided. Leave them a little loose.
Using a level across the top of the door frame,
tighten them in the proper sequence to the keep the door frame level.
Pack gap between bricks and door frame (inside
firebox) tightly with ceramic wool.
Install firebrick split heat shields by sliding into
guides on firebox lintel. Slide forward until they touch door frame. The
heatshield bricks on either end require a notch to clear doorjambs.30330
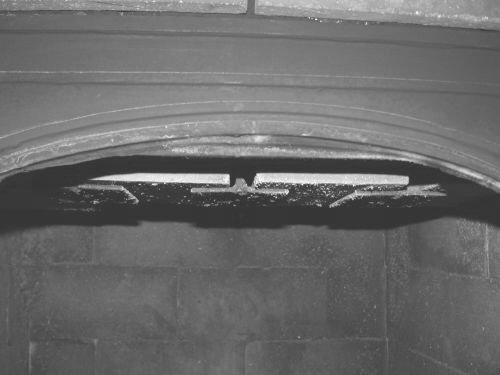
Figure 4. Location of heat shield bricks relative to
door.
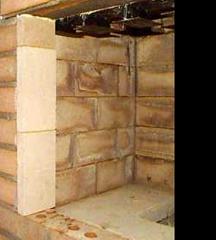
Installing Doors in a Stone Facing
With
a stone facing, the easiest way to create the opening for the doors is with a
wooden plug made from 1/2” plywood and
2x4’s.
Note: the doors come packaged in two pieces of
plywood with the required measurements.
|
Figure 5 |
Figure 6 |

Installing Bakeoven Door
The
bakeoven door is held in place with a ¼” Tapcon on either side of the frame.
You will need to drill the frame at the appropriate height to either hit a
brick or a mortar joint, depending on the installation (with dense stone, for
example, you would line the holes up with a mortar joint). No firebrick splits
are required on the doorjambs, as they are with the firebox door. Stuff the
space between the frame and the doorjamb bricks with the white ceramic fiber
supplied.
Firebrick Split Heatshields:
Refer
to Figure
7, below. Note that, after installing the doors, the
firebrick split heat shields are shortened and rounded at the back to provide
smoother airflow at the rear edge.
Installing Firebox Air and Outside Air
Figure 7
An insulated flex duct is connected from the 6” thimble to a screened grill, preferably on the windward side of the house. If your local code does not require outside air, you can skip this step. It will not affect performance of the heater.
Figure 8 Air Bar is positioned and held in place with mortar at the ends. Refer to Figure 7 for dimensions.
Template for Oven Arch in Facing
Figure 9